Introduction
Running local models with Ollama or LM Studio? Calling cloud APIs from OpenAI or Anthropic? Your AI infrastructure needs real network isolation. Most home and small-office setups run AI workloads behind an ordinary ISP router with:
- No VLAN or zone isolation
- No deep packet inspection
- No egress filtering
- Ollama listening on port 11434 with no authentication
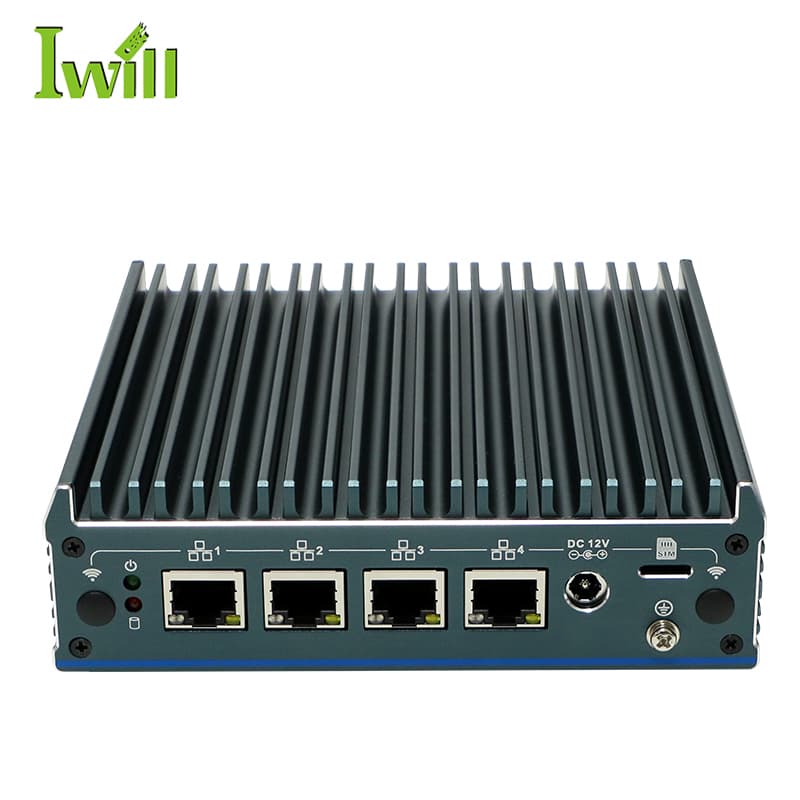
This guide shows how to build ClawFirewall – a proper AI firewall using the IWILL N1241, OPNsense and Zenarmor – in about 60 minutes. If you want the background first, read why self-hosted AI needs a firewall.
What you will end up with: four isolated network zones (WAN, LAN, AI_LAB, IOT), deep packet inspection with Zenarmor, real-time cloud threat intelligence and an egress allow-list for cloud AI APIs – all on one compact, fanless appliance.
Hardware requirements
| Component | IWILL N1241 specification |
|---|---|
| CPU | Intel Alder Lake N200 (4C/4T, up to 3.7 GHz, AES-NI) |
| RAM | 8 GB DDR4 minimum (16 GB recommended, the maximum) |
| Storage | 128 GB SSD minimum |
| Network | 4× Intel i226-V 2.5GbE |
| Power | <15 W, fanless |
| Dimensions | 144 × 136.7 × 42 mm, 0.79 kg |
Why the N1241?
- 4 physical NICs = real zone isolation without a managed switch
- Intel i226-V has excellent FreeBSD/OPNsense support
- AES-NI for full-speed VPN encryption
- Fanless for silent 24/7 operation
You will also need
- A USB stick (4 GB+) for the installer
- At least two Ethernet cables
- A monitor and keyboard (initial install only)
- A computer to download and write the image
Network architecture
Each physical port becomes its own zone. The access matrix below is what the firewall rules will enforce.
| From \ To | Internet | LAN | AI_LAB | IOT |
|---|---|---|---|---|
| LAN | ✅ | ✅ | ✅ | ✅ |
| AI_LAB | ✅ | ❌ | ✅ | ❌ |
| IOT | ⚠️ DNS + HTTPS only | ❌ | ❌ | ✅ |
Phase 1: create the boot USB (5 minutes)
Go to opnsense.org/download, choose architecture amd64 and image type vga, and download the .img.bz2 file (about 400 MB).
Windows: extract the file with 7-Zip, open Rufus, select your USB stick and the .img file, then press Start. Linux / macOS:
# Extract
bunzip2 OPNsense-*-vga-amd64.img.bz2

# Find the USB device
lsblk            # Linux
diskutil list    # macOS

# Write it (replace sdX with your device!)
sudo dd if=OPNsense-*-vga-amd64.img of=/dev/sdX bs=4M status=progress
syncWarning: check the target device carefully – dd overwrites it without asking.
Phase 2: install OPNsense (15 minutes)
Connect port 1 to the ISP router (WAN), port 2 to your laptop, plus the USB stick, HDMI monitor and keyboard.
Power on the N1241
Log in to the installer
installer, password opnsense.Run the installation
Set the root password
Finish and reboot
After the reboot OPNsense detects the interfaces automatically: WAN on igc0 (port 1) and LAN on igc1 (port 2), with a DHCP server on 192.168.1.0/24.
Phase 3: web configuration (10 minutes)
From the laptop on port 2 (it receives a 192.168.1.x address), open https://192.168.1.1, accept the self-signed certificate warning and log in as root. The setup wizard then asks for:
- General information – hostname
ai-firewall, domainlocal, DNS 1.1.1.1 and 9.9.9.9. - Time server – timezone Europe/London, NTP
pool.ntp.org. - WAN – DHCP for most home connections, static for a business IP, PPPoE if your ISP requires it.
- LAN – keep the default 192.168.1.1/24.
- Root password – confirm, then Reload and wait for the restart.
Phase 4: configure the AI_LAB and IOT zones (15 minutes)
Because every zone has its own physical port, you do not need VLAN tags: assign the remaining ports directly. Under Interfaces → Assignments, add igc2 (port 3) and igc3 (port 4), then configure them:
AI_LAB (igc2 / port 3)
Enable ✅ • IPv4: Static • 192.168.20.1/24
DHCP range 192.168.20.10 – 192.168.20.250
IOT (igc3 / port 4)
Enable ✅ • IPv4: Static • 192.168.30.1/24
DHCP range 192.168.30.10 – 192.168.30.250
Using a managed switch?: if you later want to carry several zones over one cable, create VLANs under Interfaces → Other Types → VLAN (for example tag 20 for AI_LAB, 30 for IOT) and configure the matching tagged ports on the switch. Devices plugged straight into the N1241 send untagged traffic, which is why this guide uses whole ports.
Enable the DHCP servers for both zones under Services → DHCPv4, using each interface address as the gateway and DNS server.
Phase 5: install Zenarmor (10 minutes)
- Go to System → Firmware → Plugins and press Check for updates to refresh the list.
- Search for
zenarmor, click + next toos-zenarmorand wait two to three minutes. - Reload the page.
Important: Zenarmor and Suricata both capture packets through netmap and cannot run on the same interface. Keep this build simple and do not install os-suricata.
Setup wizard (Services → Zenarmor)
- Deployment mode: Routed mode.
- Interfaces: the internal zones – LAN, AI_LAB and IOT.
- Cloud connection: register at sunnyvalley.io and paste the activation key from the email.
- Security policies: enable malware blocking, botnet protection, phishing prevention and web application control.
On the Zenarmor dashboard, open the … menu next to Engine Status, press Start and turn on Start on boot. After about 30 seconds the status should read Running.
Phase 6: firewall rules (10 minutes)
Firewall → Rules → AI_LAB
- Block – source AI_LAB net, destination LAN net.
- Pass – source AI_LAB net, destination any.
Order matters: the block rule must sit above the pass rule.
Firewall → Rules → IOT
- Block – IOT net to LAN net.
- Block – IOT net to AI_LAB net.
- Pass – TCP/UDP port 53 (DNS).
- Pass – TCP port 443 (firmware updates).
Phase 7: testing (5 minutes)
1. Internet
ping 8.8.8.8 and ping google.com from the LAN should both work.
2. Zenarmor
The dashboard should show Engine Status: Running, Cloud Threat Intel: up, and live traffic graphs.
3. Isolation
From a device on port 3, ping 8.8.8.8 works but ping 192.168.1.1 fails. If it fails, the isolation is working.
Optional: allow-list for cloud AI APIs
For hybrid setups, restrict the AI_LAB zone to approved cloud endpoints only.
Under Firewall → Aliases, create an alias called Allowed_AI_APIs of type Host(s):
api.openai.com
api.anthropic.com
generativelanguage.googleapis.com
api.mistral.ai
api.cohere.ai
Then, in the AI_LAB rules, add a Pass rule above the general internet rule: source AI_LAB net, destination Allowed_AI_APIs, port 443. Change the general internet rule to Block (or delete it and rely on default deny). AI_LAB can now reach only the approved AI APIs. Add package mirrors or model registries to the alias if your tools need them for updates.
Quick reference
| Port | Interface | Subnet | Purpose |
|---|---|---|---|
| 1 | WAN | DHCP | Internet |
| 2 | LAN | 192.168.1.0/24 | Trusted devices |
| 3 | AI_LAB | 192.168.20.0/24 | AI infrastructure |
| 4 | IOT | 192.168.30.0/24 | Smart devices |
Troubleshooting
Cannot reach the web interface
From the console menu, choose option 3 to reset the root password, or option 1 to check interface assignments.
Zenarmor will not start (“Device busy”)
Another netmap user such as Suricata is installed. Remove it under System → Firmware → Plugins.
No internet on WAN
Check the cable to the ISP router, confirm DHCP or static settings under Interfaces → WAN, then test with Interfaces → Diagnostics → Ping.
A zone gets no IP address
Confirm the interface is enabled, its DHCP server is on, and the cable is in the right port.
Conclusion
You now have a professional ClawFirewall protecting your infrastructure: four isolated zones, Zenarmor threat detection with cloud intelligence, a contained AI network and a restricted IoT network – built in roughly an hour.
- Back up the configuration: System → Configuration → Backups → Download.
- Enable 2FA: System → Access → Users → edit root → add OTP.
- Set up remote access: VPN → WireGuard.
- Update regularly: check System → Firmware at least once a week.
Prefer to skip the build? IWILL supplies pre-configured units and support options – see the AI Firewall page.
Hardware for this build
Fanless multi-port appliances tested with OPNsense and pfSense.